
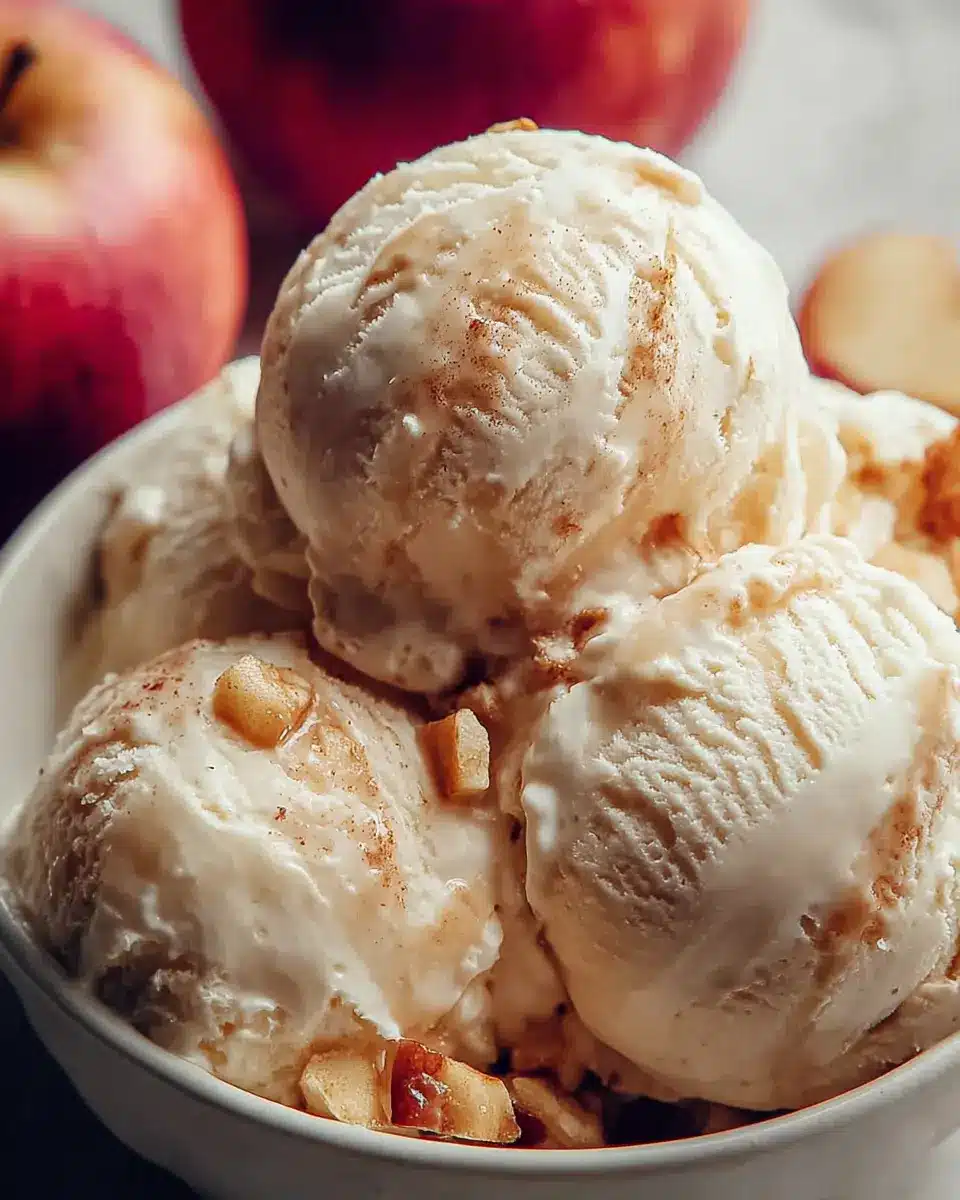
Introduction to Creamy Homemade Apple Pie Ice Cream
As summer approaches, our cravings for refreshing treats grow stronger, and nothing satisfies quite like creamy homemade apple pie ice cream. This delightful dessert is genuinely a game changer for summer gatherings, picnics, and those hot afternoons when you need something cool and comforting.
When you think of apple pie, you likely imagine warm spices and tender fruit — well, what if I told you all those flavors could be captured in a luscious scoop of ice cream? The beauty of this recipe lies in its intricate blend of sautéed cinnamon-spiced apples, rich snickerdoodle cookies, and buttery pie crust pieces. All these elements combine to create a unique frozen version of a classic dessert that is both nostalgic and exciting.
Plus, making your own ice cream allows you to control the sweetness, texture, and even the ingredients. Whether you’re hosting a backyard BBQ or just looking to indulge on a quiet evening, this no-churn recipe offers a simple and delightful way to enjoy the comforting flavors of apple pie in the form of a refreshing summertime delight.
Link to learn more about homemade ice cream basics here and discover what makes it such a cherished summer staple.
Ingredients for Creamy Homemade Apple Pie Ice Cream
Creating your own creamy homemade apple pie ice cream is a delightful way to enjoy summer, and it all starts with the right ingredients! Let’s break it down into three main components: Apple Pie Filling, Ice Cream Base, and Add-ins.
Apple Pie Filling
- 3-4 Apples: Choose from the best varieties like Honeycrisp, Granny Smith, or Gala for a perfect balance of tartness and sweetness.
- 0.5 cups Sugar: Adjust based on the natural sweetness of the apples you select.
- 1 teaspoon Cinnamon: This classic spice adds warmth; feel free to swap it for nutmeg for a unique spin.
- 2 tablespoons Butter: For sautéing and adding that rich flavor.
Ice Cream Base
- 2 cups Heavy Cream: Opt for full-fat coconut milk if you’re going dairy-free.
- 1 cup Whole Milk: Alternatively, you can use almond milk for a lighter option.
- 1 can Sweetened Condensed Milk: This brings the luscious creaminess; choose a no-sugar version if you want to lighten it up.
Add-ins
- 1 cup Snickerdoodle Cookies: These add delightful crunch and flavor. Feel free to get creative and choose your favorite cookie!
- 1 cup Pie Crust Pieces: Pre-baking ensures these stay crispy amid the creamy goodness.
With these ingredients in hand, you're just a few steps away from a delicious treat that captures the essence of a classic apple pie in a frozen delight. Ready to dive in? Check out our full recipe to get started!
Step-by-Step Preparation of Creamy Homemade Apple Pie Ice Cream
When the summer heat hits, there's nothing quite like the refreshing taste of homemade ice cream, especially when it captures the essence of a classic dessert. Here's a straightforward guide for making creamy homemade apple pie ice cream that will leave your friends and family begging for more. Let’s break it down, step by step.
Prepare the Apple Pie Filling
The heart of this delicious ice cream lies in the apple pie filling. To start, grab about 3-4 apples—Honeycrisp, Granny Smith, or Gala work wonderfully due to their unique flavors.
- Chop the apples into small pieces.
- In a skillet, melt 2 tablespoons of butter over medium heat.
- Add the chopped apples, ½ cup of sugar, and 1 teaspoon of cinnamon. Sauté for about 5-7 minutes until the apples soften and exude that heavenly aroma. Don’t forget to stir occasionally to prevent them from sticking!
- Once cooked, let the mixture cool to room temperature. Cooling is essential; otherwise, the heat can alter the ice cream base's consistency.
Make the Ice Cream Base
The ice cream base is where the creamy magic happens! In a large mixing bowl, prepare to whip up your cream.
- Use a hand mixer or stand mixer to whisk 2 cups of heavy cream until soft peaks form—this usually takes about 3-4 minutes.
- Gently fold in 1 cup of whole milk and 1 can of sweetened condensed milk into the whipped cream. This blend brings richness and sweetness, creating a wonderful base for your creamy homemade apple pie ice cream.
Combine All the Ingredients
Once you have your base ready, it’s time for the fun part—combining everything!
- With a spatula, carefully fold the cooled apple pie filling into the ice cream base.
- Next, add 1 cup of crushed snickerdoodle cookies and 1 cup of pie crust pieces—this adds texture and flavor, perfectly mimicking that apple pie experience.
- Mix gently; the goal is to preserve the fluffiness of the whipped cream while ensuring even distribution of the apple and cookie goodness.
Freeze the Mixture
Now we are in the final stretch! The last step is to freeze your creation.
- Transfer your combined ice cream mixture into an airtight container. To avoid ice crystal formation, press plastic wrap directly onto the surface before sealing it with the lid.
- Freeze for at least 4 hours, or until the ice cream is firm. Waiting can be tough, but it's worth it for that perfect scoop!
With these simple steps, you’ll have a batch of creamy homemade apple pie ice cream that embodies the joy of summer and the comforting flavors of apple pie. So, gather your loved ones, scoop out some of your delicious creation, and enjoy! For more delightful summer recipes, check out Food Network and Bon Appétit.

Variations on Creamy Homemade Apple Pie Ice Cream
Dairy-Free Delight
For those with dietary restrictions, opting for a dairy-free version of creamy homemade apple pie ice cream is easier than you think. Simply swap out the heavy cream for full-fat coconut milk and replace whole milk with almond milk. The rich texture of coconut milk will still give you that irresistible creaminess while keeping it dairy-free. So, gather your favorite apples and enjoy a guilt-free treat!
Extra Crunch with Nuts
Want to elevate your creamy homemade apple pie ice cream? Add some crunch by folding in a handful of chopped nuts! Pecans or walnuts can bring an extra layer of texture and complement the sweet, spiced apple flavor beautifully. Just be sure to keep the nuts toasted for even more flavor. It’s an easy twist that takes this classic summer dessert to the next level, and your taste buds will thank you!
For more on ice cream variations, check out Serious Eats' guide to ice cream add-ins.
Cooking Tips and Notes for Creamy Homemade Apple Pie Ice Cream
Importance of Cooling the Filling
Letting the apple pie filling cool completely before mixing it into your creamy homemade apple pie ice cream is crucial. If you add warm filling to the ice cream base, you'll risk melting the whipped cream and losing that luscious, airy texture. Cooling also lets the flavors meld, intensifying the taste of your finished treat. Patiently waiting isn’t always easy, but trust us; it's worth it!
Pre-Baking Pie Crust Pieces
For the best texture, don’t skip pre-baking the pie crust pieces. This step ensures they remain delightfully crisp when folded into your ice cream. Soggy crust isn’t the vibe you want for your summer dessert! Simply cut your crust into small pieces, bake them until lightly golden, and then let them cool. Enjoy this little crunchy twist that adds to the overall experience of your creamy homemade apple pie ice cream!
For more tips on pie crust perfection, check out sources like King Arthur Baking for expert advice.

Serving Suggestions for Creamy Homemade Apple Pie Ice Cream
Pair with Warm Desserts
Elevate your creamy homemade apple pie ice cream by pairing it with warm desserts. Imagine enjoying a generous scoop atop a slice of fresh, warm apple pie or alongside a steaming piece of chocolate cake. The contrast of warm and cold creates a delightful experience, making each bite feel like a cozy hug!
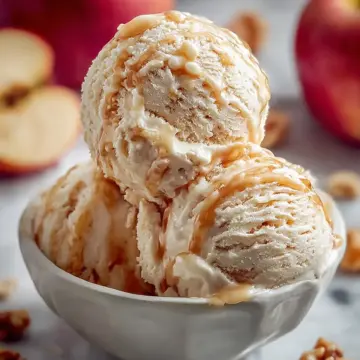
Add Toppings for a Creative Touch
Unleash your creativity with toppings! Drizzle some caramel sauce, sprinkle crushed snickerdoodle cookies on top, or even add chopped nuts for an extra crunch. You could also experiment with whipped cream and a dash of cinnamon for that classic pie touch. The possibilities are endless, so go ahead and have fun crafting your perfect dessert!
For more serving ideas, check out this great dessert blog.
Time Breakdown for Creamy Homemade Apple Pie Ice Cream
Preparation Time
This delightful creamy homemade apple pie ice cream takes only 15 minutes to prepare. A quick sauté of your apples and a few simple mix-ins will have you on your way to creating an indulgent dessert in no time!
Cook Time
The cooking process for the apple filling requires just 7 minutes. This short amount of time allows you to achieve that perfect tender texture and enhances the warm, aromatic spices you want in your ice cream.
Total Time
Though the work is minimal, the total time to enjoy your creamy homemade apple pie ice cream adds up to 4 hours and 22 minutes, including freezing time. This includes letting the mixture chill to perfection, so it’s ideal to make it ahead of your summer gatherings!
Creating this ice cream can be a fun weekend project or a sweet way to cool down after a long day. For more tips on whipping up delicious homemade treats, explore resources like the National Dairy Council or America’s Test Kitchen. Happy ice cream making!
Nutritional Facts for Creamy Homemade Apple Pie Ice Cream
Calories
Indulging in creamy homemade apple pie ice cream offers about 250 calories per serving. This makes it a satisfying treat that balances flavor and personalization without completely derailing your diet.
Fats
Each serving contains approximately 15 grams of fat, primarily from heavy cream and sweetened condensed milk. While this includes some saturated fat, moderation is key when enjoying this delightful dessert.
Sugar Content
With around 20 grams of sugar per serving, this ice cream strikes a balance between sweetness and the natural flavors of apples. You can adjust sugar levels based on apple variety and personal preference!
For more detailed nutritional insights, check out resources like NutritionData or MyFitnessPal.
FAQs About Creamy Homemade Apple Pie Ice Cream
Can I shorten the freezing time?
While the ideal freezing time for creamy homemade apple pie ice cream is at least 4 hours to achieve the perfect texture, you can enjoy it sooner! If you're eager to dig in, try placing the mixture in a shallow container. This increases surface area and allows it to freeze faster—check it at around 2 hours. Just be mindful that it may be softer than expected.
How do I store leftover ice cream?
To keep your delicious apple pie ice cream fresh, store it in an airtight container and press a piece of plastic wrap directly onto the surface before sealing. This prevents ice crystals from forming and helps maintain that creamy texture. When stored properly, it should last for up to two weeks in the freezer.
What other flavors can I incorporate?
Get creative! Consider swirling in caramel sauce, adding crushed graham crackers for a s'mores twist, or mixing in other seasonal fruits like pears or peaches. Want a spice boost? A touch of nutmeg alongside the cinnamon offers a delightful variation. Enjoy experimenting!
Conclusion on Creamy Homemade Apple Pie Ice Cream
Indulging in creamy homemade apple pie ice cream is truly a delightful experience. Its blend of cinnamon-spiced apples, crunchy cookies, and rich ice cream transports you to cozy moments. Perfect for summer treats, this easy recipe brings comfort and joy, making every scoop a little slice of happiness in the sun. Enjoy!
Creamy Homemade Apple Pie Ice Cream for Summer Bliss Recipe
Equipment
- Skillet
- Mixing bowl
- Hand Mixer or Stand Mixer
- airtight container
Ingredients
Apple Pie Filling
- 3-4 pieces Apples Best varieties are Honeycrisp, Granny Smith, or Gala
- 0.5 cups Sugar Adjust according to natural sweetness of apples
- 1 teaspoon Cinnamon Can substitute with nutmeg for a unique twist
- 2 tablespoons Butter
Ice Cream Base
- 2 cups Heavy Cream Can use full-fat coconut milk for dairy-free
- 1 cup Whole Milk Almond milk is a lighter alternative
- 1 can Sweetened Condensed Milk Can substitute with no-sugar version for lower-calorie
Add-ins
- 1 cup Snickerdoodle Cookies Adds crunch and flavor; feel free to use your favorite cookie
- 1 cup Pie Crust Pieces Pre-bake for best texture
Instructions
Instructions
- Prepare Apple Pie Filling: Peel and chop 3-4 apples of your choice. In a skillet, sauté the chopped apples with ½ cup sugar and 1 teaspoon cinnamon over medium heat until the apples are soft and fragrant, about 5-7 minutes. Stir occasionally to prevent burning. Remove from heat and let the mixture cool completely to room temperature.
- Make Ice Cream Base: In a large mixing bowl, whip 2 cups of heavy cream using a hand mixer or stand mixer until soft peaks form, which usually takes 3-4 minutes. Gently fold in 1 cup of whole milk and 1 can of sweetened condensed milk to the whipped cream until fully combined, creating a smooth and creamy base.
- Combine Ingredients: Carefully fold the cooled apple pie filling into the ice cream base. Then add in 1 cup of crushed snickerdoodle cookies and 1 cup of pre-baked pie crust pieces, mixing gently to ensure even distribution without overmixing, which could deflate the cream.
- Freeze: Transfer the combined ice cream mixture into an airtight container. Press plastic wrap directly onto the surface to prevent ice crystals from forming. Seal with the lid and freeze for at least 4 hours, or until the ice cream is firm and ready to serve.


Leave a Reply