
Introduction to Pressed Italian Sandwiches
Pressed Italian sandwiches are not just any lunch option; they offer a deliciously convenient solution for busy young professionals. Imagine coming home after a long day, feeling famished but too tired to cook. With these savory sammies, you’ll have a flavorful meal ready to go—no cooking required!
Why Pressed Italian Sandwiches Are a Game Changer for Young Professionals
For those of us juggling careers, social lives, and personal projects, meal prep can seem daunting. Pressed Italian sandwiches are a game changer! With just 20 minutes of hands-on time, you can layer a delightful combination of chicken ham, salami, provolone, and roasted red peppers. Rest assured, they can be prepped in advance—perfect for lunches throughout the week or outdoor picnics.
The secret to that mouthwatering flavor? Pesto! When you smear it on the bread, it locks in moisture, ensuring that every bite is satisfyingly tasty. Plus, pressing the sandwiches allows the flavors to meld overnight, making your next meal a treat to look forward to. According to a 2023 study, pre-prepared meals not only save time but also reduce stress about what to cook!
Embrace the ease and enjoyment of pressed Italian sandwiches, and elevate your lunch game today!
Ingredients for Pressed Italian Sandwiches
When it comes to crafting the perfect pressed Italian sandwiches, selecting the right ingredients can make all the difference! These flavorful bites not only satisfy your taste buds but also impress your friends at gatherings. Here’s what you’ll need to whip up a delicious batch:
- 1 loaf ciabatta bread: This Italian classic has a crispy crust and soft interior, perfect for holding all your fillings together.
- ½ pound sliced chicken ham: Opt for a high-quality chicken ham for that savory touch.
- ½ pound sliced provolone: This cheese melts beautifully and adds a creamy element.
- 1 jar (15 ounces) roasted whole red peppers: Make sure to drain and pat these dry to prevent sogginess.
- 2 cups spinach leaves: Fresh spinach adds a delightful crunch and nutrients.
- ¼ pound sliced salami: A touch of spice and acidity balances the richness of the cheeses.
- ⅓ cup pesto: Select a vibrant pesto—just be cautious with the oil content to keep your sandwiches from getting too wet.
- 3 tablespoons good olive oil: A drizzle adds flavor and helps crisp the bread.
- Salt and pepper: Essential for that perfect seasoning.
Trust me, these ingredients come together to create an irresistible sandwich experience! For additional tips on ingredient selections, check out verywellfit for nutrition ideas. As you prepare, consider how each ingredient contributes not just to flavor but to nutrition and enjoyment—because that's what hosting is all about!
Preparing Pressed Italian Sandwiches
Making pressed Italian sandwiches isn't just about stacking ingredients; it's about creating a meal that’s bursting with flavor and perfect for sharing. Follow these steps to prepare your delicious sandwiches so that they’re ready to impress!
Gather and prep your ingredients
Before diving into the assembly, it’s essential to gather all your ingredients. You’ll need:
- 1 loaf ciabatta bread
- ½ pound sliced chicken ham
- ½ pound sliced provolone cheese
- 1 jar (15 ounces) roasted whole red peppers, drained and patted dry
- 2 cups spinach leaves, stems removed
- ¼ pound sliced salami
- ⅓ cup pesto (the drier part is preferable)
- 3 tablespoons good-quality olive oil
- Salt and pepper for seasoning
Having everything on hand makes the process smoother. When arranging the ingredients, a nice cutting board can help you see your sandwich come together in stages. For the freshest flavors, consider using local produce or artisan bread — you won’t regret it!
Layer the chicken ham, cheese, and veggies
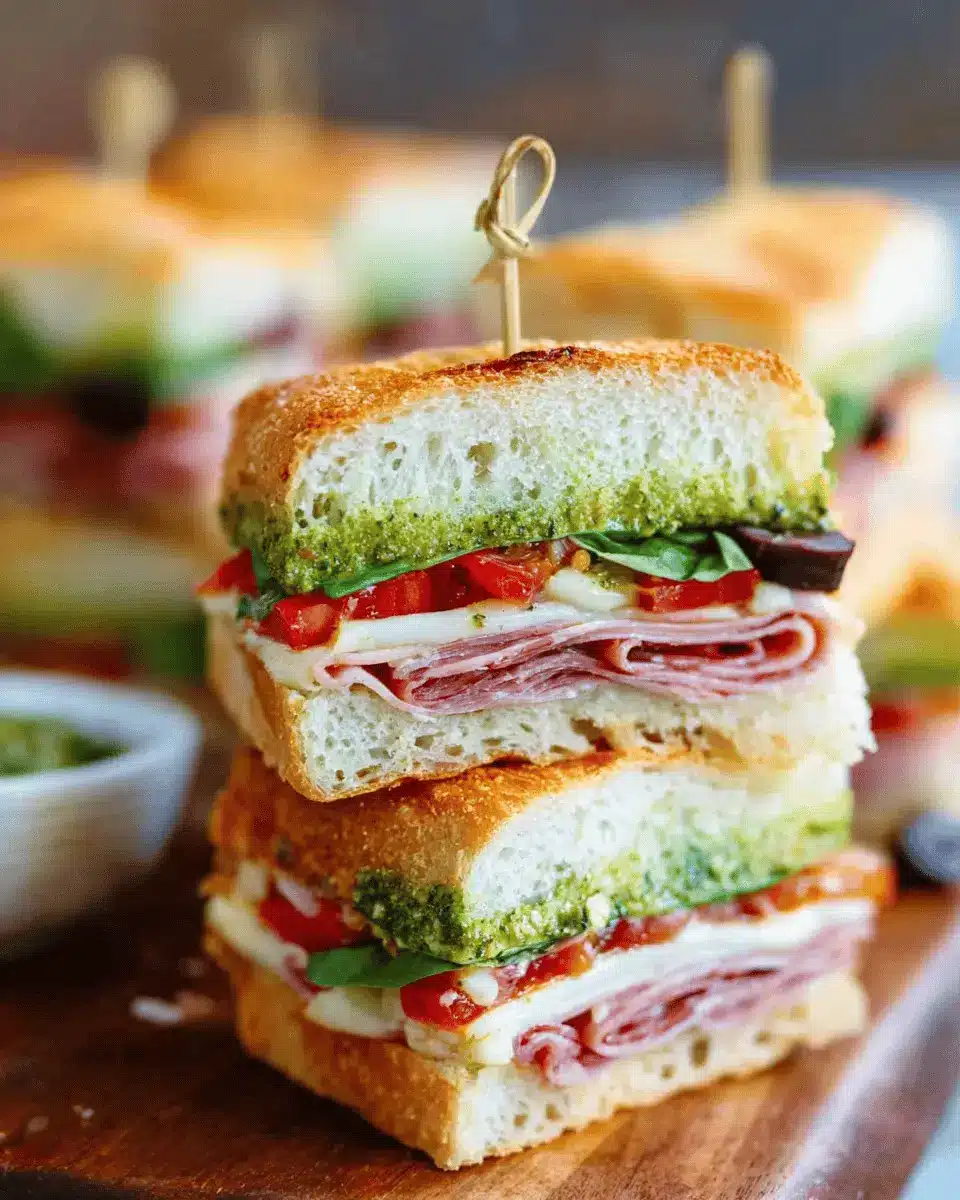
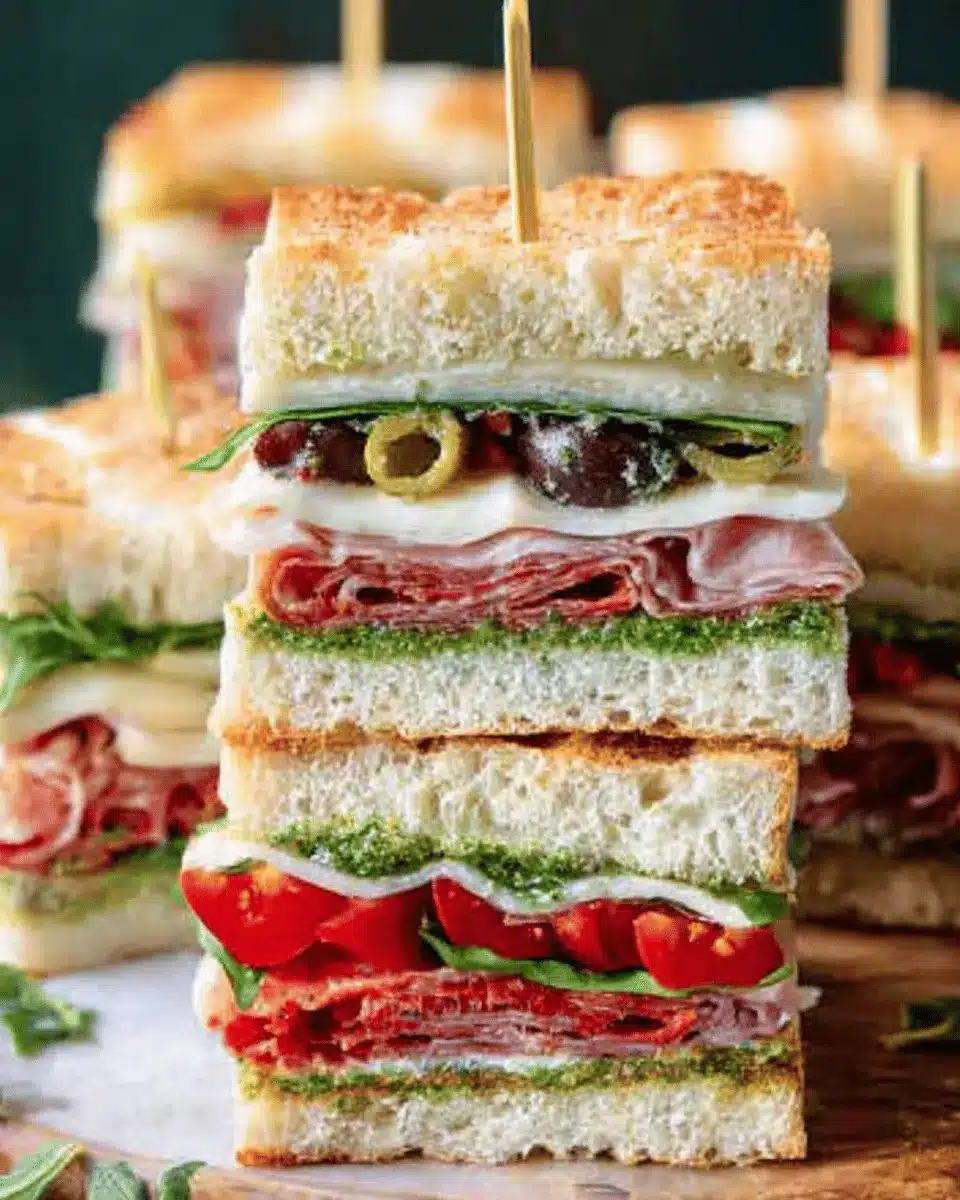
Now, let’s get to the fun part — layering! Start by slicing your ciabatta horizontally (no need for perfection; the pressing will fix any uneven edges).
- Spread pesto generously on one half.
- On the other half, drizzle olive oil and sprinkle with salt and pepper. This flavor foundation is crucial!
- Now, begin stacking:
- First, add the chicken ham.
- Follow with roasted red peppers and provolone cheese.
- Next, layer on your fresh spinach and salami for added zest.
Each ingredient plays a role in building up the flavor profile, so take a moment to enjoy the visual appeal before making it all come together!
Spread the pesto and olive oil
Applying the pesto and olive oil evenly is key to ensuring every bite of your pressed Italian sandwiches is full of flavor. By doing this, the oil helps to keep the bread from becoming too soggy while enhancing the overall richness. The pesto ingredient adds a fresh, herbaceous note that contrasts beautifully with the savory meats.
Wrap and press your sandwich
After layering, fold the top half over your masterpiece and wrap it tightly in plastic wrap. This step is crucial – ensuring your sandwich is tightly packed will keep everything together while pressing.
- Place the wrapped sandwich on a baking sheet.
- To really press the pressed Italian sandwiches, add a heavy dish on top (think cast iron pans or weights). This helps meld all the ingredients together beautifully. You can even experiment with weights like a kettle bell or some clean bricks!
Refrigerate and slice before serving
The key to perfecting the pressed Italian sandwiches lies in the chilling time. Allow the sandwich to sit in the fridge for at least two hours (or overnight for the best flavor). This not only enhances the taste but allows the juices to mingle beautifully.
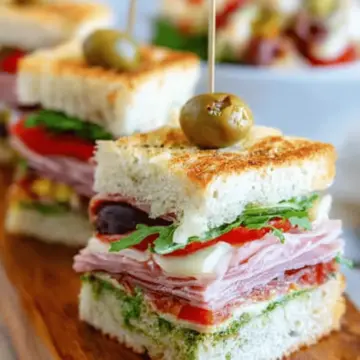
When you’re ready to serve, simply unwrap, slice, and enjoy! Garnish with toothpicks or a side of olives for that authentic touch. These sandwiches are perfect for picnics, lunch gatherings, or a quick snack at home.
For more recipe ideas or cooking tips, don’t miss exploring resources like the Food Network or Serious Eats to inspire your culinary adventures!
Variations on Pressed Italian Sandwiches
Vegetarian Pressed Italian Sandwiches
For those craving a meat-free option, vegetarian pressed Italian sandwiches are a delightful twist. Simply substitute the chicken ham and salami with roasted veggies, such as zucchini, eggplant, or mushrooms. Layer these alternatives with provolone, fresh basil, and a generous spread of pesto for a vibrant, satisfying meal. Did you know that incorporating more plants into your diet can enhance energy levels?
Spicy Pressed Italian Sandwiches
If you're someone who loves a little heat, consider crafting spicy pressed Italian sandwiches. Add some spicy Italian sausage or a few slices of pepperoncini to your layers for a kick. You can also switch out the pesto for a spicy harissa spread, elevating your sandwiches to new flavor heights. According to experts, spicy foods may even help boost metabolism!
These variations allow you to customize your pressed Italian sandwiches to fit your tastes, catering to everything from vegetarian preferences to heat-seeking palates. Explore further variations through resources like Serious Eats for inspiration!
Cooking Tips for Pressed Italian Sandwiches
Creating the perfect pressed Italian sandwiches is all about layering flavors and ensuring the right balance of ingredients. Here are some helpful tips to elevate your sandwich-making game:
-
Choose Quality Bread: A good ciabatta loaf is key. It should be crusty on the outside and soft on the inside, providing a perfect foundation for your filling.
-
Keep Ingredients Dry: Make sure your roasted red peppers are well-drained. Excess moisture can make your sandwiches soggy, reducing their overall flavor.
-
Pressing Technique: After wrapping your sandwich in plastic, use a heavy weight like a cast iron skillet to ensure even pressing. This not only compacts the sandwich but also helps blend the flavors together.
Ready for a delicious lunch or picnic treat? Don't forget to refrigerate your sandwiches for at least two hours, or ideally overnight, for maximum flavor infusion. For more tips, check out resources like Serious Eats. Enjoy your sandwich-making!

Serving Suggestions for Pressed Italian Sandwiches
When it comes to enjoying your pressed Italian sandwiches, the right accompaniments can elevate the experience. Here are a few delightful serving suggestions:
-
Fresh Side Salads: Pair your sandwiches with a simple arugula salad dressed in lemon vinaigrette for a refreshing contrast. This balance complements the hearty flavors of the sandwich.
-
Chips or Crisps: A side of kettle-cooked potato chips adds that satisfying crunch. Opt for lightly salted or herb-infused varieties to maintain a yummy harmony.
-
Pickles and Olives: Adding a small platter of assorted olives or dill pickles can introduce a tangy kick, enhancing the sandwich's savory components.
-
Homemade Pasta Salad: For a heartier meal, serve the sandwiches with a vibrant pasta salad, bursting with vegetables and Italian herbs.
These combinations are sure to impress your friends at your next gathering! For more great ideas, check out this article for delicious side pairings.
Tips for Making the Perfect Pressed Italian Sandwiches
Crafting delightful pressed Italian sandwiches is an art! Here are some friendly tips to ensure yours turn out perfectly every time:
-
Choose Quality Ingredients: Opt for fresh ciabatta bread and high-quality deli meats like chicken ham and salami. The better your ingredients, the tastier the sandwich.
-
Don’t Rush the Pressing: Allowing the sandwiches to sit overnight in the fridge ensures that the flavors meld beautifully. If you're short on time, two hours will do, but overnight is best!
-
Experiment with Additions: Feel free to personalize your sandwiches. Adding ingredients like fresh basil or arugula can take the flavor to the next level.
-
Weight Matters: Use a sturdy weight when pressing the sandwiches. This ensures even pressure, enhancing that delightful compactness we're after.
With these handy tips, you’ll impress your friends and family with your pressed Italian sandwiches. Happy cooking!
Time Breakdown for Pressed Italian Sandwiches
Preparation Time
Getting the sandwiches ready takes just about 20 minutes! This includes the time to slice the ciabatta, layer your favorite ingredients, and wrap them up snugly.
Pressing Time
For the best flavor, let your pressed Italian sandwiches sit in the fridge. A minimum of 2 hours is recommended, but overnight will yield the tastiest results.
Total Time
From start to finish, including pressing time, you’re looking at a total of at least 2 hours and 20 minutes. Perfect for planning ahead for lunch or a weekend gathering!
For more tips on meal prep and making delectable sandwiches, check out resources from Serious Eats and Food Network.
Nutritional Facts for Pressed Italian Sandwiches
When prepping your Pressed Italian Sandwiches, it’s essential to understand what you're fueling your body with. Here’s a quick nutritional breakdown:
Calories
Each serving packs about 229 calories, making it a satisfying yet light option for lunch or picnics.
Protein
With 11 grams of protein, these delicious sandwiches offer a decent boost, thanks to the protein-rich chicken ham and provolone cheese.
Sodium
Keep in mind, these scrumptious treats contain 633 milligrams of sodium. While it adds flavor, you might want to balance it with low-sodium sides.
With these insights, you can enjoy your Pressed Italian Sandwiches knowing you’ve made a tasty and relatively nutritious choice! For more information on managing your sodium intake, check out Harvard Health.
FAQs about Pressed Italian Sandwiches
Can I make these sandwiches ahead of time?
Absolutely! In fact, making pressed Italian sandwiches ahead of time enhances their flavors. Prepare the sandwiches, wrap them tightly in plastic wrap, and store them in the fridge for at least 2 hours—overnight is even better. This allows the ingredients to meld beautifully together.
What can I substitute for chicken ham?
If you’re looking for alternatives to chicken ham, consider turkey ham, which provides a similar flavor profile while keeping things light. Thinly sliced roasted chicken or even beef pastrami can also work well for an extra savory twist.
How do I store leftovers?
To store any leftover pressed Italian sandwiches, wrap them tightly in plastic wrap or place them in an airtight container. They'll last in the refrigerator for 2-3 days. Just keep in mind that the texture may change slightly after being pressed and stored, but they’ll still be delicious!
For more tips on storing sandwiches, you might find this food storage guide helpful.
Conclusion on Pressed Italian Sandwiches
Pressed Italian sandwiches bring convenience and flavor to any meal. Perfect for gatherings or quick lunches, they're easy to customize. Use fresh ingredients for the best taste and enjoy the delightful textures. So go ahead, prep a batch for your next picnic or work lunch, and impress your friends!
For more meal ideas, check out The Kitchn or visit Serious Eats for delicious sandwich inspiration!
Pressed Italian Sandwiches
Equipment
- plastic wrap
- cookie sheet
- large baking dish
- weights (bricks, cast iron pan, or hand weights)
Ingredients
- 1 loaf ciabatta bread
- 0.5 pound sliced deli ham
- 0.5 pound sliced provolone
- 1 15 ounce jar roasted whole red peppers drained and patted dry
- 2 cups spinach leaves stems removed
- 0.25 pound sliced salami
- 0.33 cup pesto scoop out the driest part to avoid soggy bread
- 3 tablespoons good olive oil
- salt
- pepper
Instructions
- Slice bread horizontally. Don't worry if it isn't perfect. When these are pressed and sliced, nobody will notice!
- Spread pesto on one half of the bread and olive oil on the other. Salt and pepper over olive oil side.
- Layer your ingredients: Ham, peppers, provolone, spinach, salami.
- Add the top of the bread on and wrap tightly in plastic wrap several times.
- Place the wrapped sandwich on a cookie sheet. Add a large baking dish and some weight on top, such as bricks, a cast iron pan, hand weights, or kettle ball.
- Store in refrigerator overnight or at least 2 hours. Remove plastic, slice, and serve!
- Garnish with toothpicks and olives if desired.


Leave a Reply