
Introduction to Red Velvet Brownies
What are Red Velvet Brownies and why should you try them?
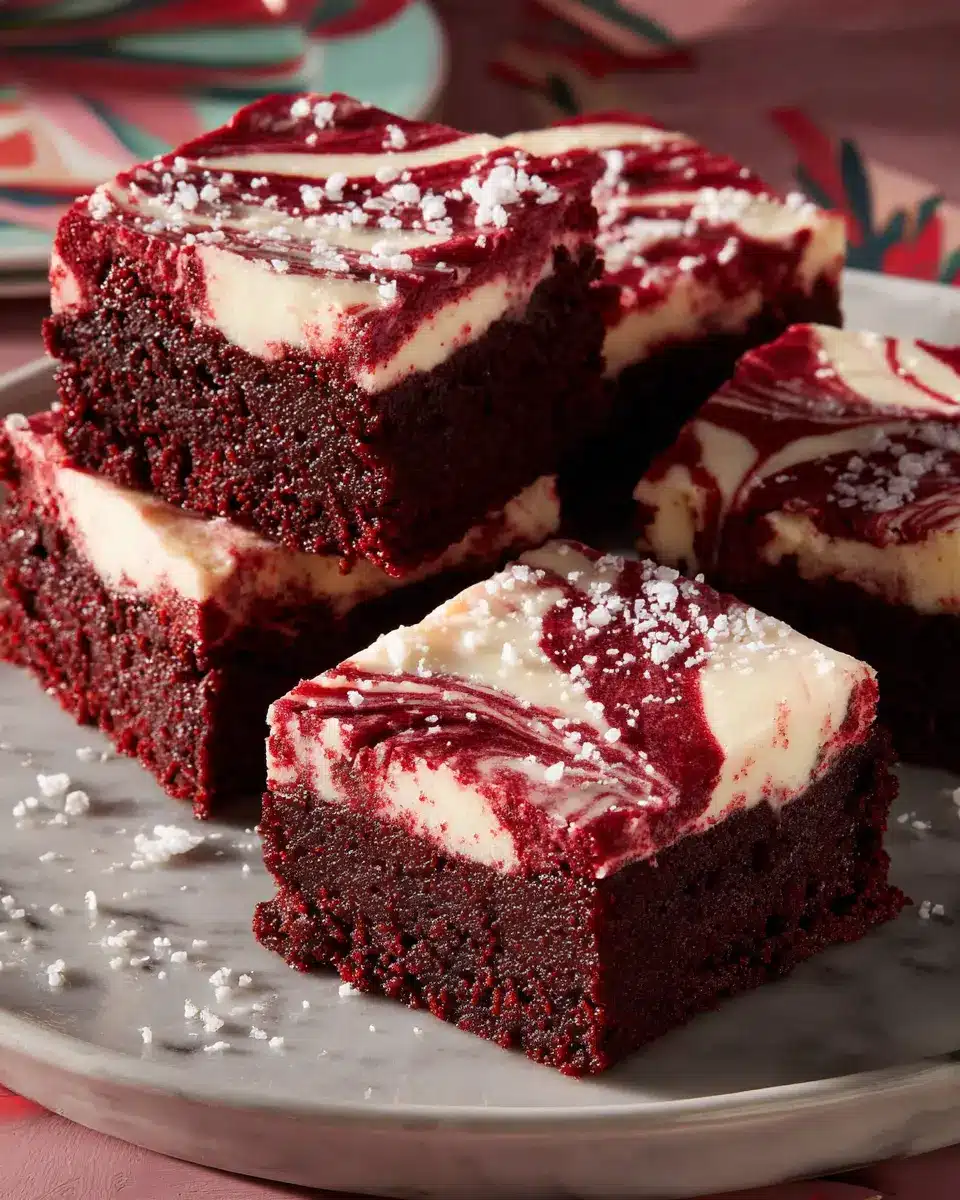
If you're a fan of decadent desserts, then you absolutely need to get acquainted with red velvet brownies! These delightful treats blend the rich, velvety texture of classic red velvet cake with the fudgy goodness of brownies. Picture this: layers of chocolatey goodness with vibrant red hues, swirled with a creamy cheesecake layer. It's a visual and culinary treat that captures the essence of celebration and indulgence.
So, what makes these red velvet brownies so special? Firstly, the combination of bittersweet chocolate and red food coloring not only results in an eye-catching dessert but also creates a unique flavor profile that’s both rich and slightly tangy—thanks to the addition of sour cream. As you bite into each piece, you'll experience a harmonious balance between the tartness of cream cheese and the deep chocolatey richness.
Why not impress your friends at your next get-together or treat yourself during a cozy night in? The steps are simple, and the end result is nothing short of extraordinary. For a deeper dive into the world of red velvet treats, you might want to check out this piece on the history of red velvet cake here. Ready to get started? Let’s dive into the ingredients and make some unforgettable red velvet brownies!

Ingredients for Red Velvet Brownies
Crafting the perfect batch of red velvet brownies is all about having the right ingredients at your fingertips. Here’s a complete list of what you'll need to achieve that delectable combination of chocolatey goodness and rich cream cheese flavor:
- Nonstick cooking spray
- 8 oz. bittersweet 60% chocolate bars, chopped
- 1 ½ cups granulated sugar, divided
- 1 cup packed light brown sugar
- 1 cup unsalted butter, cubed
- ¼ cup unsweetened cocoa powder
- 6 large eggs, room temperature, divided
- 1 (1-oz.) bottle red food coloring
- 1 Tbsp. plus 2 tsp. vanilla extract, divided
- 1 ¾ cups plus 2 tbsp. all-purpose flour, divided
- ½ tsp. kosher salt
- 1 cup white chocolate chips
- 12 oz. cream cheese, softened
- ⅓ cup sour cream, room temperature
These ingredients are not just staples; they're the heart of your brownies! A great tip is to measure everything beforehand, making the process smoother and more enjoyable. If you're curious about ingredient substitutions or tips, check out my favorite baking resource, King Arthur Baking Company, for some fantastic insights. Happy baking!
Preparing Red Velvet Brownies
Creating red velvet brownies is not just about baking; it’s an experience that combines rich flavor with a touch of elegance. Let's walk through the steps together to ensure your brownies turn out perfectly decadent.
Preheat the oven and prepare your baking pan
Start by preheating your oven to 325°F (160°C). It’s essential to get that heat going early so your brownies bake evenly. Next, grab your 13-by-9-inch baking pan and give it a good spray with nonstick cooking spray. For added security against sticking, line the pan with parchment paper, leaving about two inches hanging over the sides. This little step will make it easier to lift out your brownies later on. Don’t forget to spray the parchment paper too!
Melt chocolate and mix sugars
In a large saucepan over medium-low heat, combine 8 oz. of chopped bittersweet chocolate, 1 cup of granulated sugar, 1 cup of packed light brown sugar, and 1 cup of cubed unsalted butter. Stir the mixture consistently until melted—this should take about three minutes. Once everything is beautifully melted and blended, remove it from the heat and whisk in ¼ cup of unsweetened cocoa powder until smooth. Let it cool for about 15 minutes—this will help avoid scrambling your eggs in the next step.
Incorporate eggs and red food coloring
Now, it’s time for the fun part! Gradually whisk in 5 large eggs, one at a time, mixing well after each addition. This ensures that everything gets incorporated nicely. Add in 1 ounce of red food coloring and 1 tablespoon of vanilla extract. The batter should be a vibrant, luscious red at this point! With a spatula, fold in 1 ¾ cups of all-purpose flour and ½ teaspoon of kosher salt until you achieve a smooth consistency. Set aside ½ cup of this brownie batter for topping.
Prepare the brownie batter and cream cheese filling
While your brownie batter is resting, let’s whip up a creamy filling! In a stand mixer (or using a hand mixer), blend 12 oz. of softened cream cheese, the remaining ½ cup of granulated sugar, and 2 teaspoons of vanilla. You want this to be creamy and well combined—around 1-2 minutes. Scrape the bowl and mix in ⅓ cup of sour cream and the final egg until fully incorporated. Finally, add the remaining 2 tablespoons of all-purpose flour, mixing just until combined.
Layer and swirl the brownies
In your prepared pan, spread the majority of the brownie batter evenly. Careful now: dollop the cream cheese filling on top and smooth it out. Use teaspoons of the reserved brownie batter to create pretty dollops over the cream cheese. Now’s the time to get a bit artistic—take a toothpick or knife and gently swirl through the layers, creating a marbled effect that makes every bite a delight.
Bake to perfection
Place your masterpiece in the oven and bake for 50 to 55 minutes. A wooden pick inserted in the center should come out clean (or with a few crumbs). Once baked, allow the brownies to cool on a wire rack for about an hour, then refrigerate them for an additional hour before slicing. This will help you get those nice, clean cuts!
And there you have it—each step brings you closer to enjoying red velvet brownies that are sure to impress friends and family alike. Happy baking!
Variations on Red Velvet Brownies
Gluten-free Red Velvet Brownies
Who says you can't enjoy delicious red velvet brownies while following a gluten-free diet? Simply swap regular all-purpose flour for a high-quality gluten-free flour blend. By using this method, you won’t lose out on that rich, decadent flavor. If you’re looking for an even creamier texture, consider adding a bit more sour cream to your batter.
Red Velvet Brownies with Different Creams
Elevate your red velvet brownies by experimenting with different creamy toppings! Try adding a layer of tangy cream cheese frosting on top for a classic pairing, or perhaps a smooth vanilla buttercream for a twist. For those who love contrast, a drizzle of rich caramel or a sprinkle of sea salt can create an irresistible sweet-salty balance. Explore these variations and turn simple brownies into show-stopping desserts!
Cooking Tips and Notes for Red Velvet Brownies
Tips for Achieving the Best Texture
To ensure your red velvet brownies are delectably fudgy, avoid overmixing after adding the flour. This keeps them tender and helps achieve that perfect chewy texture. Also, opt for room temperature ingredients—this helps create a smoother batter and a better rise.
Common Mistakes to Avoid
Be cautious when measuring flour; too much can lead to dry brownies. Use a food scale or the spoon-and-level method for accuracy. Another common pitfall is not letting your brownies cool before cutting. Patience is key—waiting improves both texture and taste, enhancing your overall dessert experience.
For more baking tips, you might want to check out resources from King Arthur Baking or Bon Appétit for in-depth baking advice and techniques.

Serving suggestions for Red Velvet Brownies
Perfect pairings for serving
These red velvet brownies are decadent on their own, but you can elevate their deliciousness with the right accompaniments. Consider serving them with:
- A scoop of vanilla ice cream for a delightful contrast.
- A drizzle of cream cheese frosting for added sweetness.
- Fresh berries, like strawberries or raspberries, to bring a burst of freshness.
How to present your Red Velvet Brownies
Presentation matters! To make your red velvet brownies really shine, try these simple tips:
- Cut them into neat squares or fun shapes for a personal touch.
- Serve on a rustic wooden board or a chic cake stand to catch the eye.
- Garnish with a dusting of powdered sugar or a sprig of mint for that gourmet edge.
For more creative serving ideas, check out this food presentation guide. Enjoy your baking!
Time Breakdown for Red Velvet Brownies
When you're ready to whip up those luscious red velvet brownies, knowing how long the process takes can help you plan your afternoon or evening sweet adventure. Here’s a handy time breakdown for your baking journey:
Preparation Time
Set aside about 15 minutes to gather your ingredients and prep your baking pan. This includes melting the chocolate and mixing your wet and dry ingredients.
Baking Time
Plan for 50 to 55 minutes in the oven. You’ll want to keep an eye on it towards the end, ensuring that a toothpick inserted in the center comes out with just a few crumbs attached.
Total Time
In all, you’re looking at roughly 1 hour and 10 minutes. After that, allow about an hour to cool and chill the brownies before diving in. Perfect for a weekend treat or a cozy gathering!
For more tips on perfecting your baking skills, check out King Arthur Baking for expert advice and resources.
Nutritional Facts for Red Velvet Brownies
Understanding the nutritional value of your red velvet brownies can help you enjoy them guilt-free! Here’s a quick breakdown:
Calories per Brownie
Each brownie packs around 250 calories, making them a satisfying treat without going overboard.
Protein Content
These decadent brownies contribute about 3 grams of protein each, thanks to their egg and cream cheese components.
Sugar Content
With a sweet kick, expect approximately 18 grams of sugar per brownie, which comes from the blend of granulated and brown sugars.
For more detailed nutritional insights, consider checking reputable sources like USDA for extensive data on ingredients!
Enjoy indulging in these delicious red velvet brownies, understanding what you're savoring with every bite!
FAQs about Red Velvet Brownies
Can I use different chocolate types for this recipe?
Absolutely! While bittersweet chocolate gives these red velvet brownies a rich flavor, you can substitute it with semisweet chocolate or even dark chocolate for a deeper taste. Just keep in mind that the sweetness may alter slightly, so adjust sugar accordingly if you prefer less sweetness.
How do I store leftovers?
Storing red velvet brownies is easy! After they cool completely, cover them tightly with plastic wrap or transfer them to an airtight container. They can be kept at room temperature for about 3 days, or in the fridge for up to a week. For longer storage, consider freezing them—just wrap in foil and place in a freezer-safe bag. They’ll stay delicious for up to 3 months!
Are there alternatives for cream cheese?
If cream cheese isn't your thing or you're looking for a dairy-free option, you can try using Greek yogurt or a plant-based cream cheese alternative. Silken tofu blended until smooth can also work as a great substitute, giving you that creamy texture without the dairy.
Feel free to experiment with these options to find the perfect balance for your taste!
Conclusion on Red Velvet Brownies
If you’re a dessert lover, these red velvet brownies are an absolute must-try! With their rich chocolate flavor and creamy cheesecake layer, they elevate the classic brownie to a new level. Perfect for sharing at gatherings or indulging after a long day, these brownies are sure to impress!
Why these brownies are a must-try for dessert lovers
Indulging in red velvet brownies offers a unique twist on traditional chocolate treats. Here’s why you shouldn’t pass them up:
- Decadent Chocolate Flavor: The bittersweet chocolate and hints of cocoa create a rich, indulgent experience.
- Creamy Cheesecake Swirl: The cream cheese adds a luscious texture and contrasts beautifully with the brownie base.
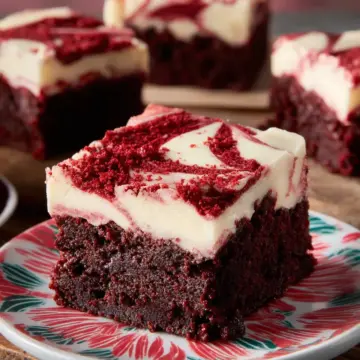
- Stunning Presentation: The vibrant red color and swirls make them a striking addition to any dessert table.
- Perfect for Any Occasion: Whether it's a birthday, holiday, or simply treating yourself, these brownies fit right in.
Next time you’re craving something sweet, give this red velvet brownies recipe a go. You won’t be disappointed—your tastebuds will thank you!
Red Velvet Brownies
Equipment
- oven
- large saucepan
- whisk
- Spatula
- Stand Mixer
- baking pan
Ingredients
Browning Mixture
- 1 can nonstick cooking spray
- 8 oz. bittersweet chocolate bars, chopped 60% cacao
- 1.5 cups granulated sugar divided
- 1 cup packed light brown sugar
- 1 cup unsalted butter, cubed
- 0.25 cup unsweetened cocoa powder
- 6 large eggs, room temperature divided
- 1 (1-oz.) bottle red food coloring
- 1 Tbsp. vanilla extract plus 2 tsp. divided
- 1.75 cups all-purpose flour plus 2 tbsp., divided
- 0.5 tsp. kosher salt
- 1 cup white chocolate chips
- 12 oz. cream cheese, softened
- 0.33 cup sour cream, room temperature
Instructions
Baking Instructions
- Preheat the oven to 325°F. Spray a 13-by-9-inch baking pan with cooking spray. Line the pan with parchment paper, leaving 2 inches on the long sides. Spray the parchment paper with cooking spray.
- In a large saucepan over medium-low heat, combine the bittersweet chocolate, 1 cup granulated sugar, brown sugar, and butter, stirring until the chocolate is melted, about 3 minutes. Remove from heat and whisk in the cocoa powder until smooth. Let cool slightly, about 15 minutes.
- Whisking constantly, add 5 of the eggs, one at a time, mixing until fully incorporated after each addition. Whisk in the red food coloring and 1 tablespoon vanilla. Fold in 1 ¾ cups flour and salt, stirring until completely smooth. In a small bowl, set aside ½ cup of the brownie batter. Fold the white chocolate chips into the remaining batter.
- Spoon the remaining batter into the prepared pan, using a spatula to spread it into an even layer.
- Meanwhile, in a stand mixer fitted with the paddle attachment or in a large bowl using an electric mixer, beat the cream cheese, the remaining ½ cup granulated sugar, and remaining 2 teaspoons vanilla at medium speed until fully combined and creamy, 1 to 2 minutes. Scrape the bottom and sides of the bowl. Beat in the sour cream and the remaining egg, mixing until fully combined, 30 seconds to 1 minute. Beat in the remaining 2 tablespoons of flour until just combined.
- Carefully dollop the cheesecake mixture all over the brownie layer; gently spread into a smooth layer. Dollop the reserved ½ cup brownie mixture by the teaspoonful randomly over the top of the cheesecake batter in the pan. Using a toothpick, skewer, or paring knife, swirl the brownie mixture into the cheesecake mixture, being careful not to press too deep to disturb the brownie layer.
- Bake until a wooden pick inserted in the center comes out clean (a few crumbs attached are OK), 50 to 55 minutes. Cool on a wire rack for 1 hour, then refrigerate for an additional hour before cutting and serving.


Leave a Reply